Technical level: Intermediate || Please read this whole thing and understand it before you start in on any of the steps. Let us know if you have any questions.
Why You Need To Know This
WordPress is possibly the most widely used website creation platform. It’s flexible and robust and has been around long enough that it is very stable. However, in the wake of popularity come criminals who will try to exploit it. Because of the sheer number of WordPress installations, these knuckleheads know that we’re lazy and they’ll hack into our code if we don’t keep up with our Security updates. That’s when things get kind of ugly.
Obviously you can mitigate much of this problem by keeping on top of your updates, but what you also need to do is make regular backups so that when you do get hacked (and you probably will) you have something reliable to roll back to.
Below is the process we use here at Duffweb. It’s bulletproof. If you get hacked but have done this prior you can quickly get yourself up and running smooth and clean.
We recommend doing this prior to ANY WordPress updates.
What you’ll need:
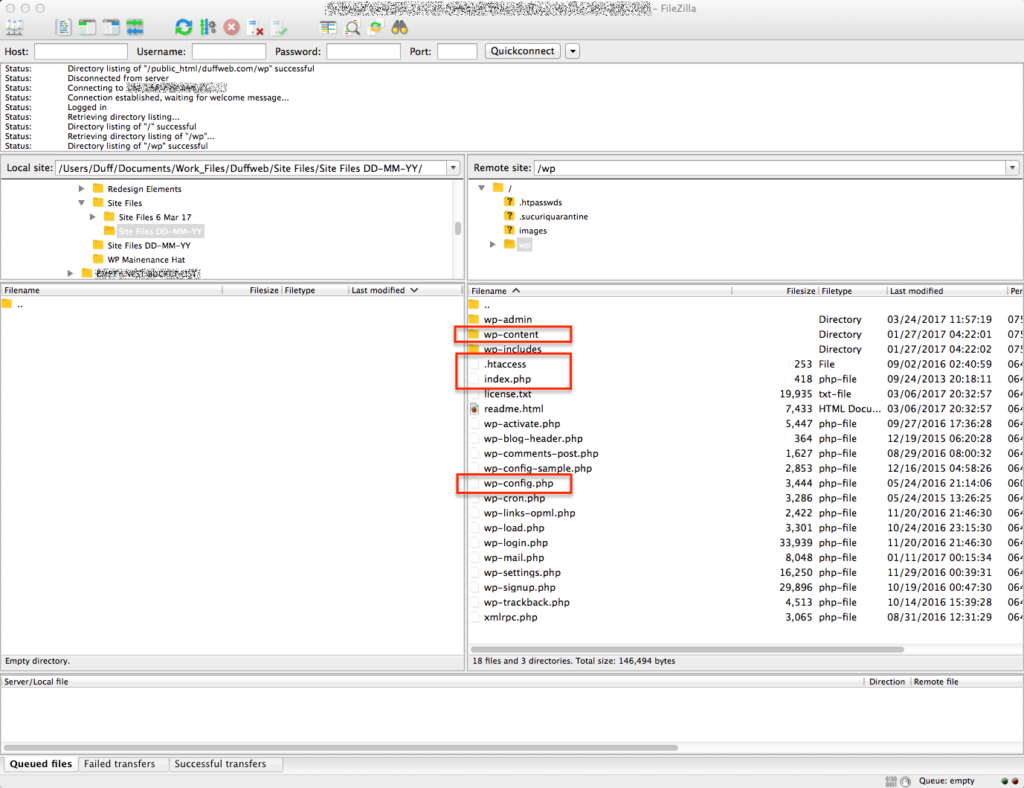
Step 1. FTP Your Site Files
If you don’t know how to FTP files, then this tutorial is not for you and we recommend you go to our WP Maintenance page and sign up for us to do it all for you.
There are only 3-5 files and 1 folder you actually need to get a solid site files backup. They are:
This list is for Linux based servers, if you’re on a Windows based server, grab the web.config file instead of the .htaccess.
Note: If you haven’t changed the permalinks or installed the files in a sub-folder (like: www.yoursite.com/wordpress/) then you may not have an .htaccess or web.config. If you can’t find it, don’t stress.
You don’t need to save any of the other WordPress files. All the others get changed each time WP updates.
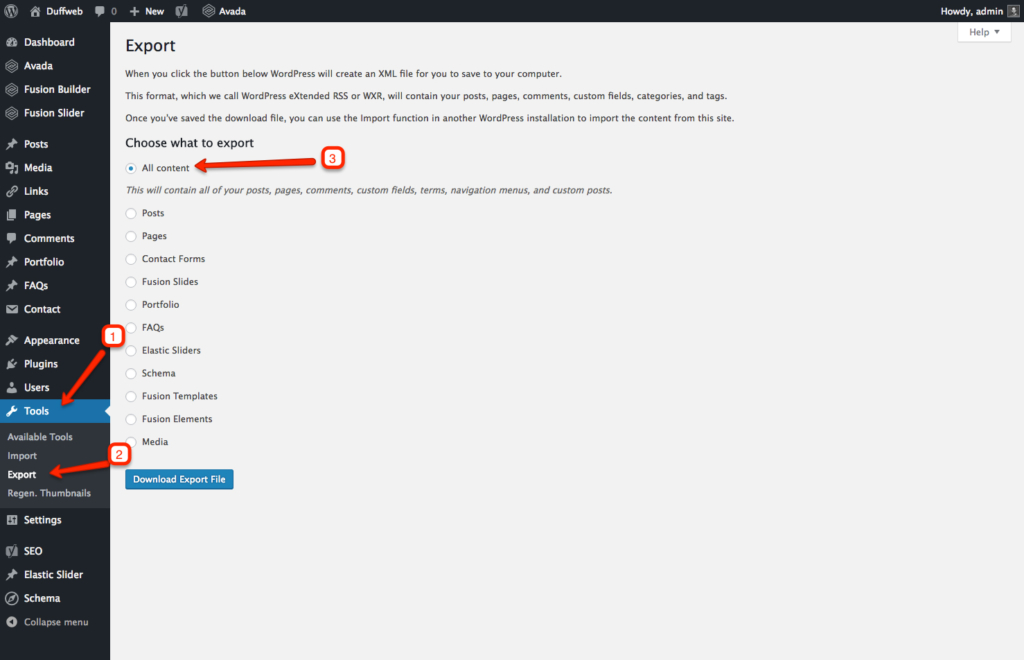
Step 2. Export Your Database from Within WordPress
This is pretty straightforward. In your WordPress Admin, got to: Tools > Export > check “All content” and then click the “Download Export File.”
We deal with a lot of clients and do a lot of these backups so we use a YY-MM-DD naming system. Depending on the service, we keep at least a couple months of them around, just in case.
Step 3. Export Your Theme Data from Within WordPress
Your theme may or may not have an export. If yours doesn’t, then don’t worry about it, the settings/options should be backed-up in the above and following Steps. But I recommend you make sure before you skip this step especially if you’re using a modern theme. If your theme does have an export, then it has its own place for the information. It also means that if your site goes down and you don’t have those settings/options backed up you’ll end up making all of those theme customizations all over again.
We use a theme called Avada for duffweb.com and you can see on the right what its theme options export looks like.

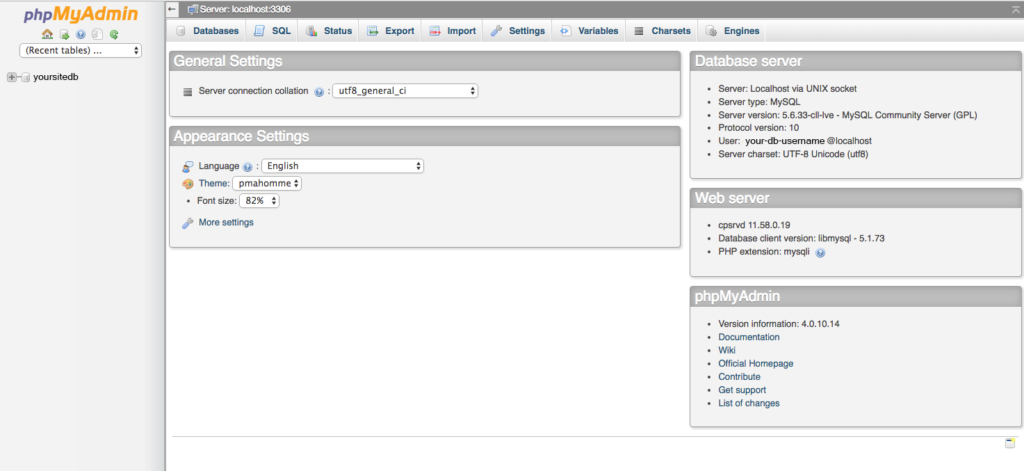
Step 4. Backup Your Database Using phpMyAdmin
This is the step that could cause some concern if you haven’t used phpMyAdmin before. You can get away with just doing the above steps and get a decent backup, but that’s not “Bulletproof,” and that’s what we do here: bulletproof backups.
Note: phpMyAdmin is not a place to be poking around if you’re not familiar with it. This is truly looking behind the wizard’s curtain. Do the simple steps below and don’t bother with anything else. This is a super powerful tool and one that can be very helpful but also pretty harmful if something is done wrong. Yes, we’ve taken down a number of sites in the early years just by simply misplacing a semi-colon. But you’re not messing with anything that can bring you down here, just follow below.
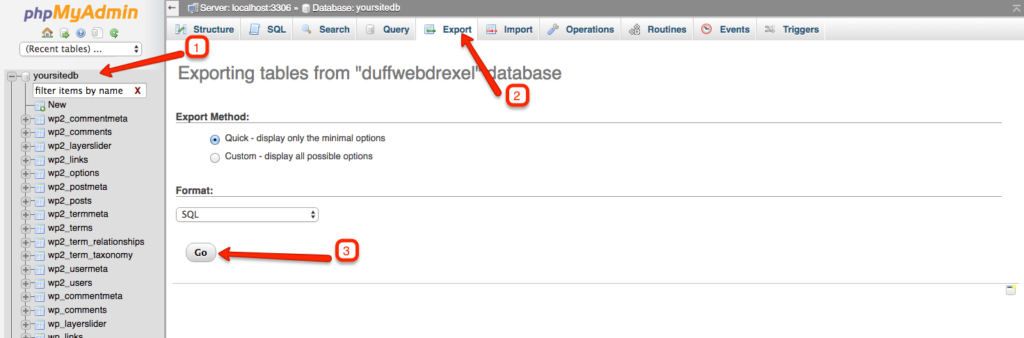
Log into your phpMyAdmin, probably through your cPanel. You’ll find something like the 1st image on the right. You will have the list of all the databases in your hosting package listed here. If you have more than one site, you’ll see them all listed here and you’ll get to do this for each one. Yay, you! Click on the database that you want to backup and it will expand down like in the 2nd image on the right. You’ll also see that database listed on the top.
Once there, click the “Export” tab and you’ll be at the Export page. You don’t need to change any of the defaults, just click “Go” and save it to your newly dated directory (or whatever your system is). It will most likely be something like “yoursitedb.sql”. If you’ve heard the term “SQL (Sequel) Database” before, now you have one of your own!
That’s It!
It’s pretty simple:
Then you can either do your updates with a clear conscience and all the comfort in the world – or roll back your site files to a time before you saw a “This site could be hacked” note in Google under your site listing!
Let us know if you have any questions or concerns, or if you have a better way of doing it!


Leave A Comment